Toilet paper bowls
- Posted on
- By Kathrin
- Posted in Decoration, Gift, Spring/Easter, Upcycling
- 0
Hier geht's zum ARTIKEL AUF DEUTSCH
Four reasons why these bowls make a great DIY project:
First, you need only a few materials, and you probably already have everything at home. Second, it’s super easy to make. Third, it’s an upcycling project. And last but not least, the bowls look absolutely fantastic!
You can use them for jewelry, as decoration, as a small gift, or as an Easter nest.
So, let’s get started!

Here’s what you need:
Toilet paper
Water (a deep plate for the water if needed)
A small bowl
Paint for decorating (optional)
If you like: a pair of scissors

Instructions
1 Take a sheet of toilet paper, wet it, and place it in the bowl. Layer sheet by sheet on top of each other until the inside of the bowl is completely covered with multiple layers of toilet paper.
Tipps:
> You can tear the toilet paper into smaller pieces.
> If there is already a lot of water in the bowl, place the next layer of toilet paper on top without wetting it first.
> Air bubbles may form between the layers. Gently press them out from the bottom to the top.
> As a guideline only: For a small bowl, you’ll need about 15 sheets of toilet paper.
2 Let your bowl dry overnight.

3 Once dry, you can easily remove your paper bowl.
4 You can leave the edge as it is or trim it smoothly with scissors.
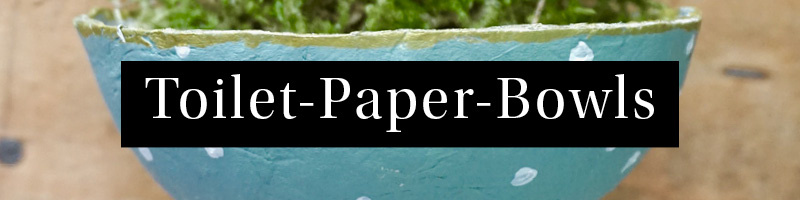
5 Paint your bowl however you like! I love using acrylic paints and highlighting the edge with a gold marker or adding dots to the bowls (for this, I used a glossy paint marker).
6 If you like, you can seal the bowls with a varnish, such as Mod Podge.

♥ Have you made your own paper bowls? Feel free to share pictures of it on Instagram and mention @miom_studio so I can see it and share your post! ♥
Feel free to follow me for more craft ideas:
Instagram Facebook Pinterest Youtube
Comments
Be the first to comment...